

Paintagraphy - Painted Landscapes
I wanted to dedicate this blog to something I have been exploring that is beyond conventional photography. It is not anything new that I invented and has been around for as long as photography has, and that is, hand painting on photographs. A few people have approached me on the matter and asked to learn more. So here I go, enjoy!For a few years now I have been experimenting with this technique and I find that it takes my photography to a different level. In Fine Art Photography you have a vision, something you want to say and try to convey. To convey this vision, you are limited within the means that the camera and post processing software can provide. By hand painting on my photographs, I feel that I can not only express my vision, but also add an extra dimension that the photographic print lacks, and that is tangible texture and a third dimension of depth. The addition of colour paint and the thickness in which I apply it, creates a different work of art altogether, not to mention, a unique ‘one of a kind’ art piece that can never be reproduced exactly the same (as opposed to a printed photograph). I can even use the same base image (the photograph) to create two separate paintings on it to produce two different one of a kind art pieces.I start out with a black and white image. The image must be complete and meet the standards of any other of my images – it needs to stand on its own merit. I never take a photograph thinking ‘this one I will paint on’. I try to achieve the perfect image as a finished photograph giving thought to in camera composition as well as post processing tonal balance in black and white. It is only after I have the final image, that I consider painting on it, ideally on a black and white image, otherwise the colour from the paint won’t pop out.You can print the original image on different mediums. Canvas makes a great medium as the canvas texture adds to the painterly look (I find that glossy canvas works best). I have also printed on an aluminum mount which has a more modern look. It does depend on the image and personal taste. However, I would not recommend printing on paper as the water or oils from your paint will bleed over time into the paper. If you do print on canvas, you will need to get it stretched on a wooden frame, easiest to do this before you start painting.Now I have a black and white image as my starting point and I just add in the colours. I personally find that painting with acrylics adds a nice vibrancy, but oil paints can work just as well. This is personal preference. Choosing Your Subject Matter:
I personally LOVE trees. This was also an easy subject to start out with as all I needed to do was paint in the leaves. I did have in my mind’s eye the colour pattern or ‘feel’ of the image I wanted and from there, the painting process was just ‘free flow’. For my first attempt I was actually inspired by a maple tree outside my window. Not being raised in Canada, I cannot stop being amazed at the beauty of these gorgeous trees. Every day of the year it would be a different colour. In the fall when the leaves were shades of red and orange, the sun would shine on it and add a luminescence that I found hypnotizing. 
Spider Tree - Black and White Photograph

Spider Tree – Inspired by the maple tree outside my window. This was my first attempt at painting on my photographs and I did it with oil paints.

Galiano Tree - Original Image in Sepia Tone

Cuban Tree - Original Black and White Photograph

Cobra Tree Original Black and White Photograph

Galiano Tree - Painted
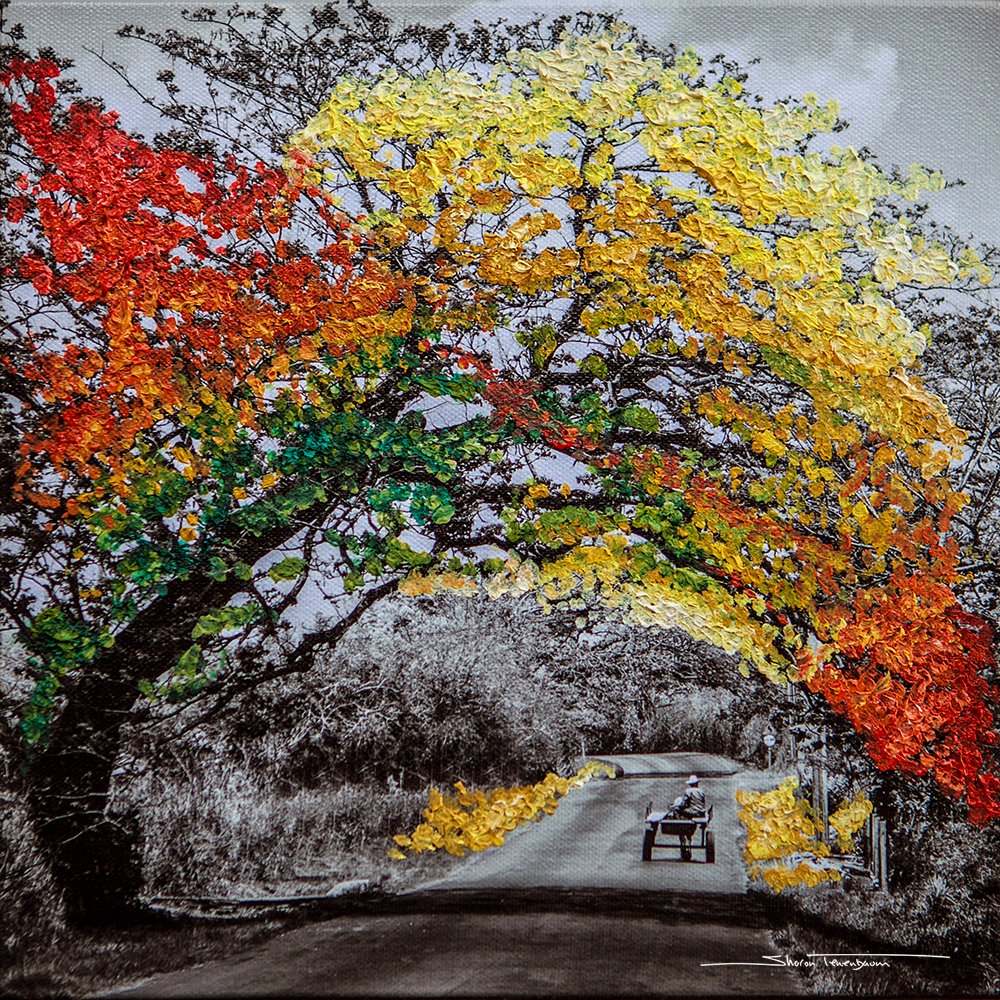
Cuban Tree - Painted
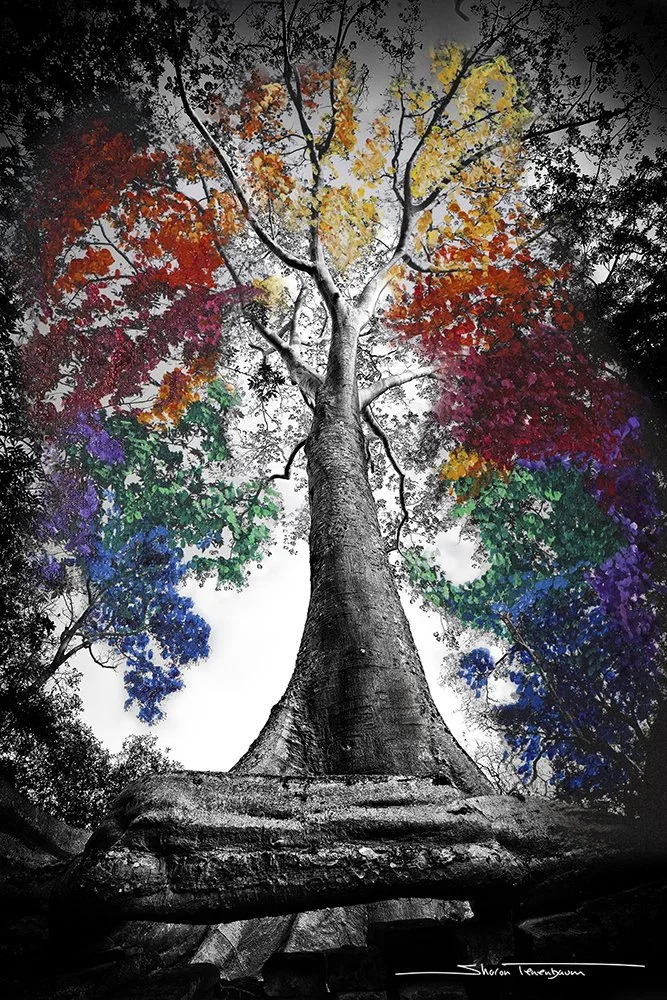
Cobra Tree - Painted
With time I explored with a larger colour pallet and different subject matter like seascapes or my Vancouver Skyline image (shown below).
Howe Sound Sky Original Black and White Photograph

Howe Sound Sky Painted

Vancouver Skyline Original Black and White Photograph
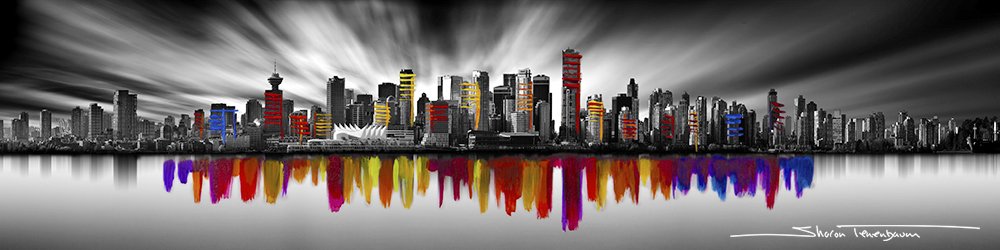
Vancouver Skyline Painted
Layering:
As much as painting can be very right-brain and artistic, you do need a fair amount of analytical thought when painting. In the painting process you need to layer your tones from darks to brights and structure the composition to your vision.Recently I have been experimenting with adding gold leaf and resin. The gold leaf adds a pop of shine and radiance (in Cartagena Tree – Image above and in video below). The resin allows me to add paint to the black and white image of the tree to create a layer, then add a resin layer, paint another layer, add a resin layer and so on. As the resin is a thick coat of clear acrylic, the top layers will look like they are floating above the ones below, and thus create a three-dimensional look.When starting out I recommend printing an image on a 12X12 inch canvas (or anything similar). This size is large enough to get detail yet not too large to overwhelm. It gets harder to work with larger pieces not to mention the additional cost of production.Working with Resin
If you are interested in exploring with resin, here are a few tips:1. Resin needs to be poured on a hard surface, so if your art piece was painted on canvas, you will need to get it stretched on a wooden panel rather than just a wooden frame. Otherwise the canvas will sag in the middle from the weight of the resin.2. Resin quality varies with brands. I have tried a few and the best one I can recommend is from ArtResin.com they have a few tutorials, tips and ideas as well as a very handy calculator that will help you determine the amount of resin and hardener you need for your art piece.3. Pour your resin in a dust free environment. Dust is not your friend when it comes to resin pours.When You are Ready to Pour the Resin:
1. Before you begin, tape the back side of the art piece with duct tape (see figure 1 below). The resin will pour down the image and leave dried droplets on the backside of the frame. These droplets will prevent the image from sitting flush against the wall. If you place duct tape, you will be able to remove the tape with the droplets after the resin has dried and cured.2. Elevate your art piece on a covered surface as once the resin dries it will harden and you won’t be able to remove it (see figure 2 below). I personally use cottage cheese/yogurt containers.3. Make sure that your art piece is leveled (test it with a bubble level) as the resin is a fluid and will flow unevenly if not leveled properly.4. Always work with gloves on your hands (even goggles to protect your eyes) as the resin is VERY sticky and hard to remove.5. The resin needs to be mixed with a hardener, make sure to mix properly in a measuring container for at least 4 minutes. (equal parts resin and hardener).6. Have alcohol and paper towels at your disposal in case the resin gets on your hands or on anything that needs to be removed. I find that I always get some resin on my hands at the end of the process after taking my gloves off. Alcohol does a great job on removing the resin while it is still wet.7. After pouring the resin, spread evenly (any flat object will do, even a business card).8. This stage is important:
After you pour the resin (and during the mixing) there will be lots of air bubbles forming. Use a blow torch to remove them. The heat of the blow torch will pop the bubbles. This stage is very important. Take your time and do not rush in carefully finding all the bubbles, you might need to get very close to the art piece and look from different angles as the resin creates a glossy glare.9. After all air bubbles are removed, scan for dust speckles on your image, if you see any, use a toothpick to remove them. Some people even cover the art piece with a tarp to prevent dust to settle on the image. Dust will leave permanent marks and will create an imperfect surface.10. At this stage I will smoothen the sides of the frame with my hand (glove on) as I personally don’t like seeing the dripping of the resin on the sides but that is my personal preference.11. Give the art piece a good 24 hours to cure.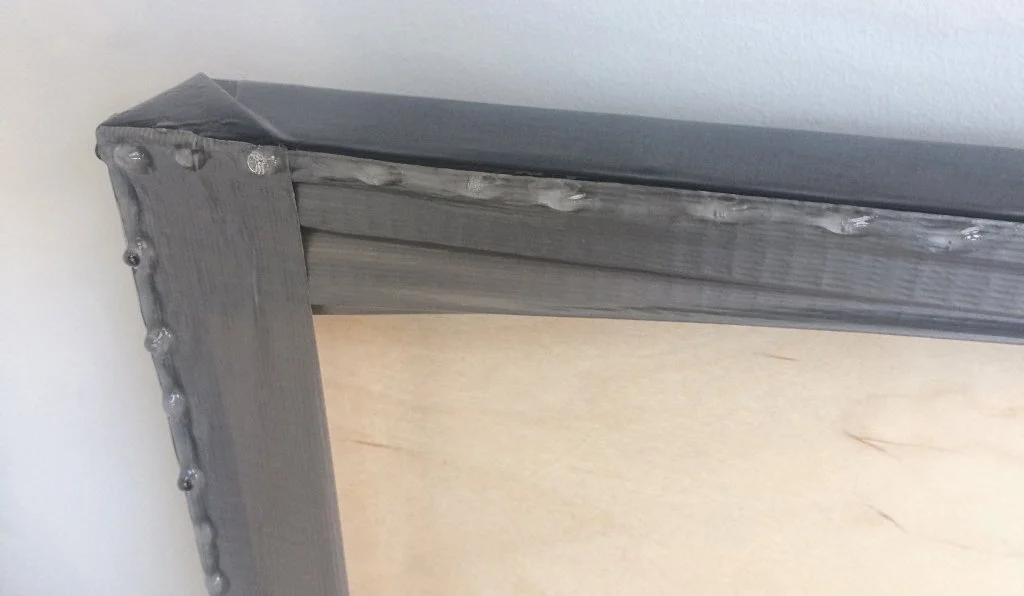
Figure 1: Taping duct tape to the backside of the panel so the hardened droplets can be easily removed once the resin is dry.

Figure 2: Prepping for the resin pour. Since the resin drips along the side of the image, best to prop it up. I used cottage cheese containers here.
This video shows the third and last resin layer pour on this image. This is my Cartagena Tree painted as autumn colours with gold leaf on the bottom of the image.Let the creative juices flow! Have fun experimenting and trying new things with your photographs.